Last time we left off with some pretty decent-looking planets (in my not so humble opinion). But there were a couple of items still to check off the list.
Parameterization
The big ticket item from my point of view is that it's really hard to parameterize the planets and play around with different designs. In particular, editing everything in the toolbar meant I couldn't easily save a design and see it again later. So I've come up with a simple XML-based template language that I can use to edit the parameters, save an XML file and load it back later.
I won't go into too much detail of how this works, it's pretty basic XML parsing. We populate a template object that just contains all the properties. The individual components then use the template to populate their own parameters. You can see in the screenshot below, the UI of my test application is greatly simplified, because now I just edit the XML file and click "Refresh" to generate the image.

One cool feature that I added was that if I select a piece of XML, then click "Refresh", it'll render just that piece of the definition. It makes it really easy to debug the individual components of the image. Heres's the planet above where I've just selected the

Atmosphere
One of the last big ticket items missing is the ability to render an atmosphere. All our planets so far look kind of lifeless and just perfect spheres hanging in space. Real planets have an atmosphere and that atmosphere interacts with the light from the sun to produce a nice glowing effect around the planet.
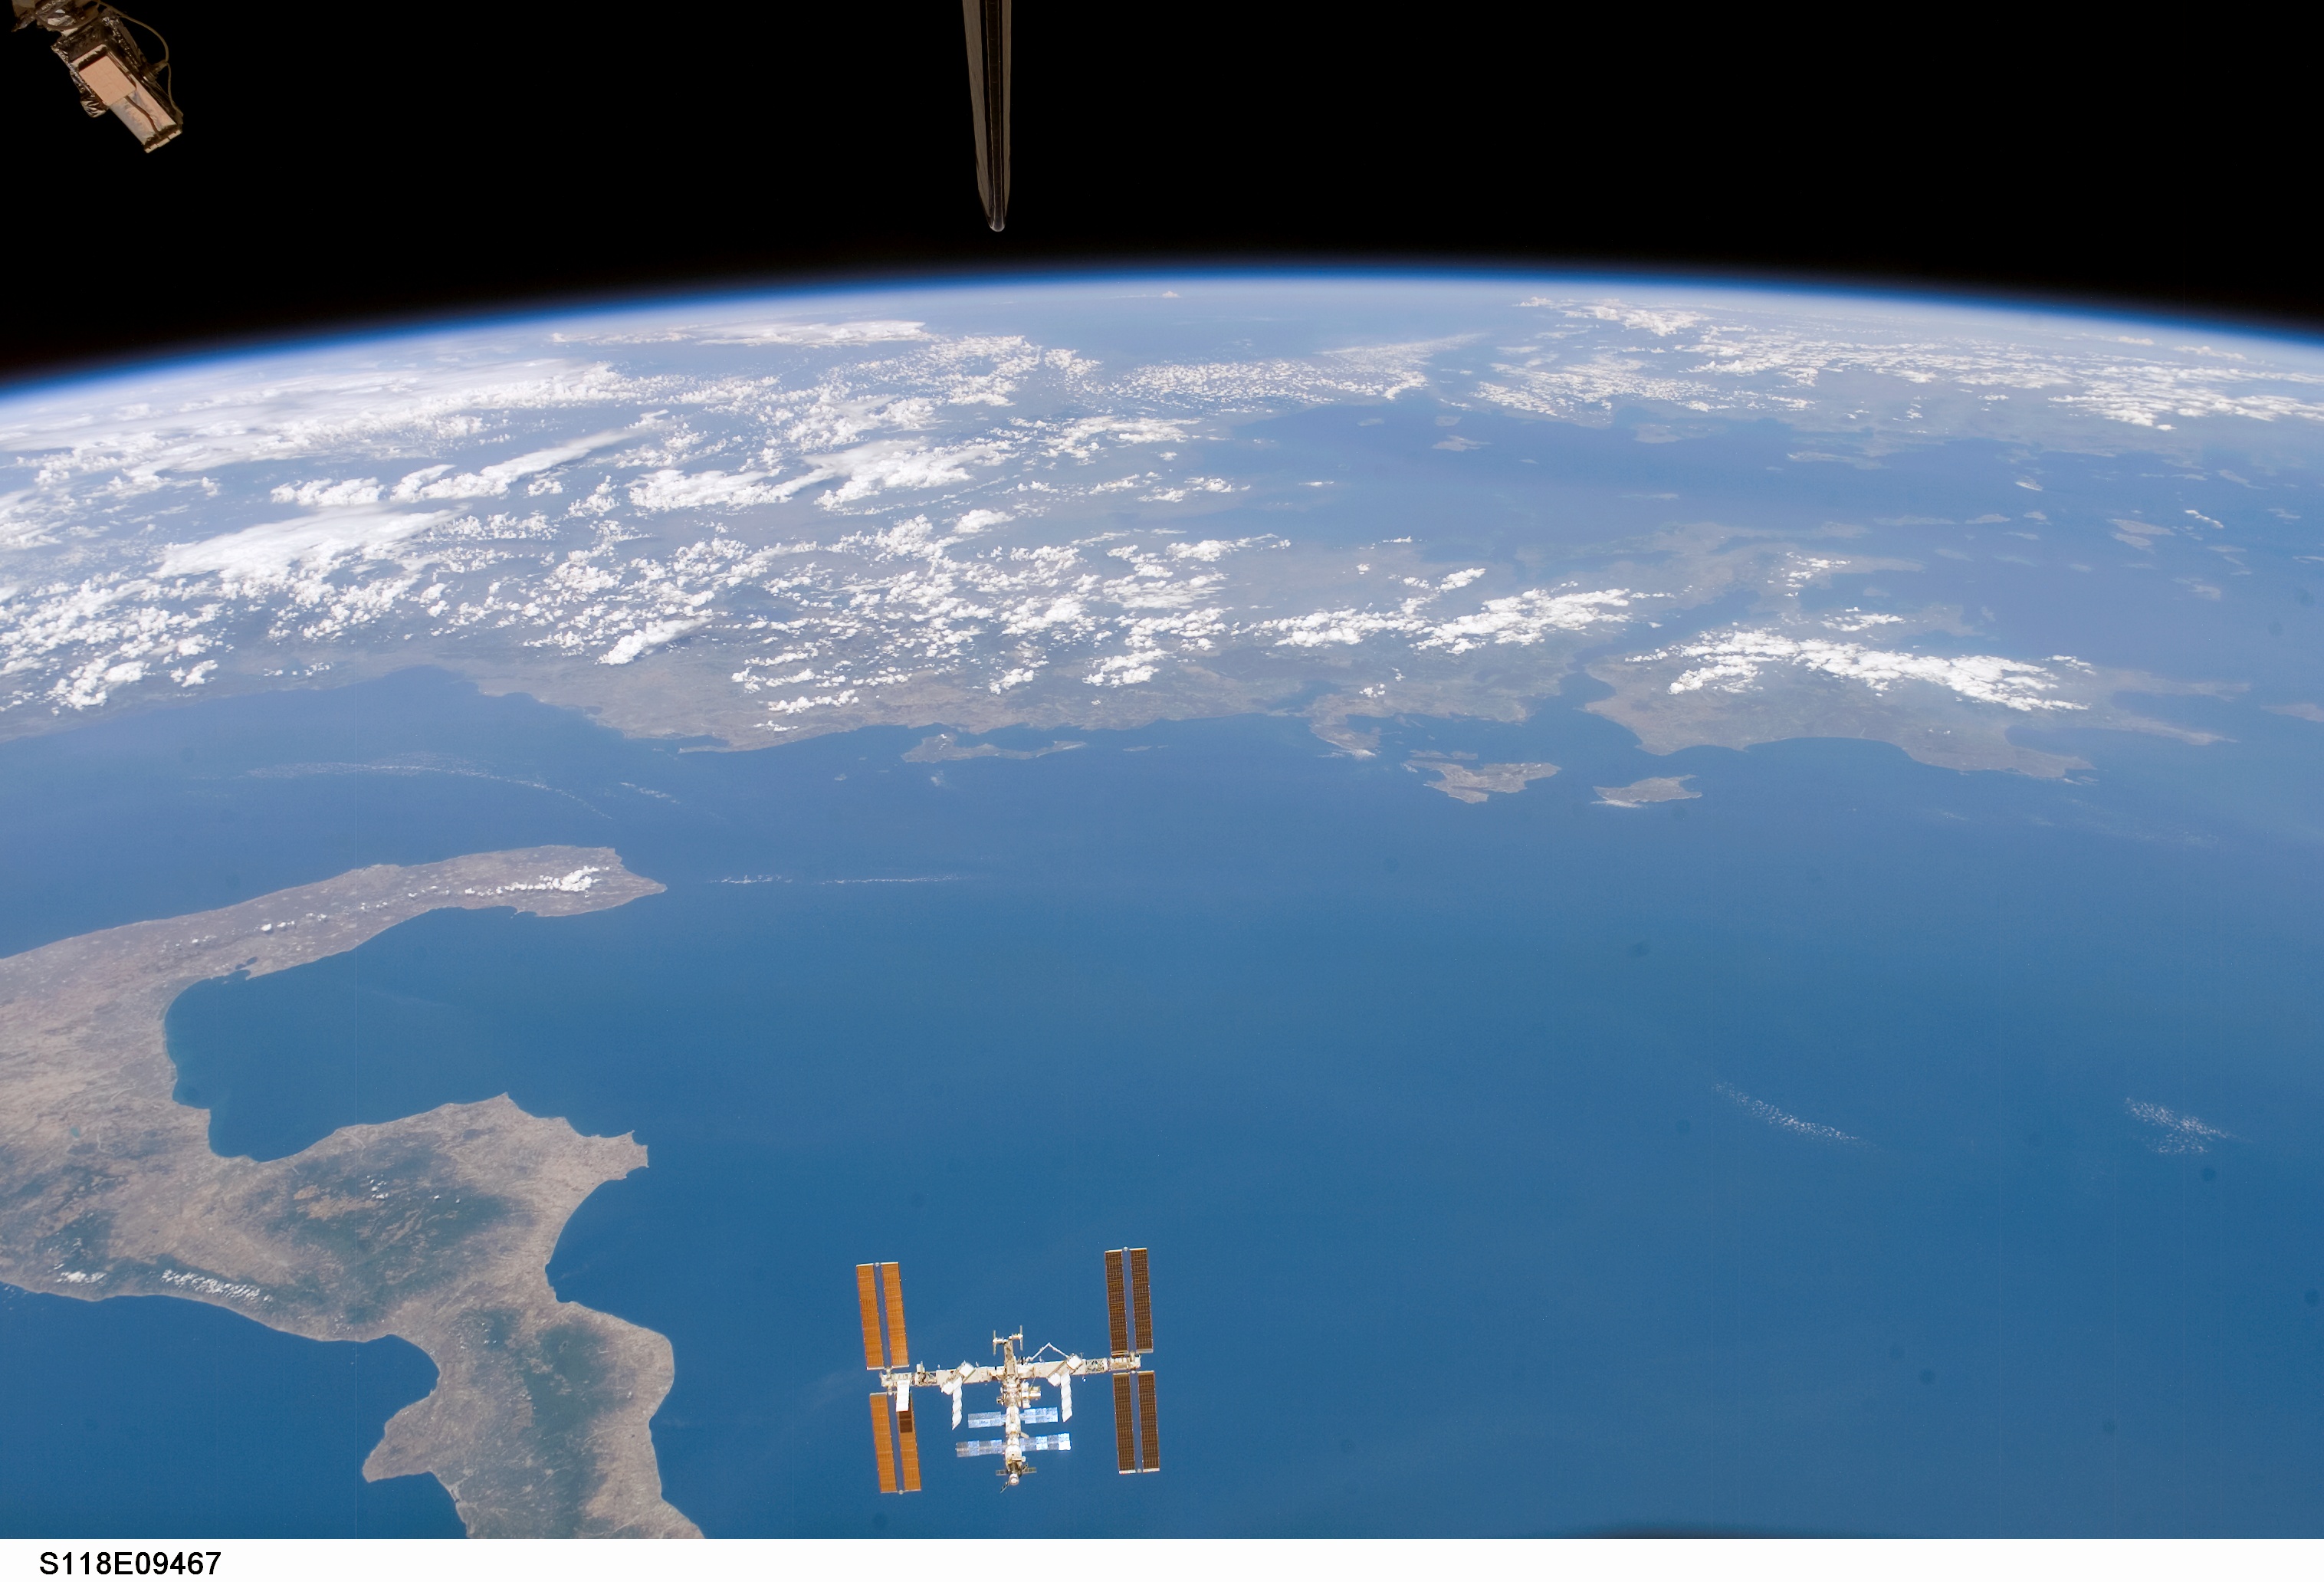
Now, in reality the atmosphere around most planets (including Earth!) is so small that you can barely see it unless you're right up close. Here's an example of Earth's atmosphere from Nasa. But realism is boring, and the atmosphere lets us add an extra dimension to our images. It also gives us something more to help differentiate the different kinds of planets. So screw realism, let the atmosphere shine!
Inner Atmosphere
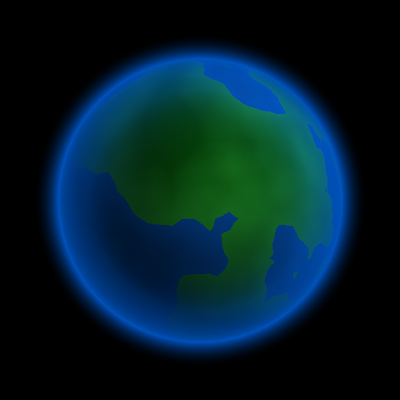
I'm going to split up the rendering of the atmosphere into two. The first will be the "inner" atmosphere, which is what covers the planet itself. The other kind will be the "outer" atmosphere which will represent the "glow". Here's a terran planet with a somewhat exaggerated "inner" atmosphere (exaggerated so you can see it more clearly):

To generate this, we modify our getPixelColour method from way back in Part 1. When the ray intersects the sphere, we do an extra calculation to get the value of the atmosphere from a ColourGradient:
private Colour getPixelColour(double x, double y) {
    Colour c = new Colour();

    Vector3 ray = new Vector3(x, -y, 1.0).normalized();
    Vector3 intersection = raytrace(ray);
    if (intersection != null) {
        // we intersected with the planet. Now we need to work
        // out the colour at this point on the planet.
        Colour t = queryTexture(intersection);

        double intensity = lightSphere(intersection);
        c = new Colour(1.0, t.getRed() * intensity,
                            t.getGreen() * intensity,
                            t.getBlue() * intensity);

        if (mAtmosphere != null) {
            Vector3 surfaceNormal = Vector3.subtract(
                    intersection, mPlanetOrigin).normalized();
            Vector3 sunDirection = Vector3.subtract(
                    mSunOrigin, intersection).normalized();

            Colour atmosphereColour = mAtmosphere.getInnerPixelColour(
                    intersection, surfaceNormal, sunDirection);
            c = Colour.blend(c, atmosphereColour);
        }
    }

    return c;
}
So everything up to the if (mAtmosphere) line is the same as before. But now we pass a reference to the surface normal, the direction to the sun and the point of intersection to the Atmosphere class's getInnerPixelColour method, which looks like this:
public Colour getInnerPixelColour(Vector3 pt,
                                  Vector3 normal,
                                  Vector3 sunDirection) {
    if (mInnerColourGradient == null) {
        return Colour.TRANSPARENT;
    }

    Vector3 cameraDirection = Vector3.subtract(
            new Vector3(0, 0, 0), pt).normalized();
    double dot = Vector3.dot(cameraDirection, normal);

    Colour c = mInnerColourGradient.getColour(1.0 - dot);
    return c;
}
As you can see, it's quite simple (so far!) The dot product we do will return a value between 0 and 1 depending on whether the surface normal is pointing at the camera or not. So when the normal is pointing at the camera, we want to use the colour at 0.0 on the colour gradient. When the normal is 90 degrees to the camera (which will be when it's right on the edge of the sphere) we return 1.0.
The following XML describes a colour gradient that'll generate the image above:
Outer Atmosphere
Now, for the outer atmosphere (that is, the "glow" around the outside of the planet), we can't use the point of intersection because - by definition - there is no intersection! Instead, what we calculate is the point along the current ray that's closest to the planet and use that to generate our gradient.
So back in our getPixelColour method, we make the following modification:
private Colour getPixelColour(double x, double y) {
    . . .
    if (intersection != null) {
        . . .
    } else if (mAtmosphere != null) {
        // if we're rendering an atmosphere, we need to work out
        // the distance of this ray to the planet's surface
        double u = Vector3.dot(mPlanetOrigin, ray);
        Vector3 closest = Vector3.scale(ray, u);
        double distance = Vector3.subtract(closest, mPlanetOrigin).length();
        distance -= mPlanetRadius;

        Vector3 normal = Vector3.subtract(
                closest, mPlanetOrigin).normalized();
        Vector3 sunDirection = Vector3.subtract(
                mSunOrigin, closest).normalized();

        Colour atmosphereColour = atmosphere.getOuterPixelColour(
                normal, distance, sunDirection);
        c = Colour.blend(c, atmosphereColour);
    }

    return c;
}
So now we call getOuterPixelColour, passing in the surface normal (at the point on the sphere where our ray passes by), the distance to the surface of the planet and the direction to the sun.
public Colour getOuterPixelColour(Vector3 normal,
                                  double distanceToSurface,
                                  Vector3 sunDirection) {
    if (mOuterColourGradient == null) {
        return Colour.TRANSPARENT;
    }

    distanceToSurface /= mOuterAtmosphereSize;
    Colour c = mOuterColourGradient.getColour(distanceToSurface);
    return c;
}
Very simple, we query the colour gradient directly based on the distance to the surface. The parameter mOuterAtmosphereSize lets us extend the glow however far we want. Here's an example with both an inner and outer atmosphere defined:
I've given it a black background so you can see it more clearly (it looks much better against a black background than a white one - that's how it looks in-game as well).
Shadowing
One thing that's a little unrealistic is that the atmosphere is glowing even on the dark side of the planet. Obviously that doesn't happen in real life, so lets add some code to calculate the "shadow" of the atmosphere:
private double getSunShadowFactor(double dot, double sunStartShadow,
                                  double sunFactor) {
    if (dot < 0.0) {
        dot = Math.abs(dot);

        // normally, the dot product will be 1.0 if we're on the
        // exact opposite side of the planet to the sun, and 0.0
        // when we're 90 degrees to the sun. We want to swap
        // that around.
        dot = 1.0 - dot;
    } else {
        // if it's positive, then it's on the sun side of the
        // planet. We'll still allow you to start chopping off
        // the atmosphere on the sun side of the planet if you want.
        dot += 1.0;
    }

    if (dot < sunStartShadow) {
        final double min = sunStartShadow * sunFactor;
        if (dot < min) {
            dot = 0.0;
        } else {
            dot = (dot - min) / (sunStartShadow - min);
        }

        return dot;
    }

    return 1.0;
}
So the math here is a little ugly, but we have two tunable parameters, sunStartShadow and sunFactor which let us control at what point the atmosphere starts disappearing and how fast it disappears respectively. The parameter dot is the dot product of the surface normal with the sun direction.
Playing around with those values, we can make a planet that looks like this:
Adding noise
I'm sure you've guessed by now, but we're big fans of noise here. What sort of effects can we achieve if we add noise to the atmosphere? Adding noise is quite simple, with our PerlinNoise class:
private double getNoiseFactor(double u, double v,
                              PerlinNoise perlin, double noisiness) {
    double noise = perlin.getNoise(u, v);
    return 1.0 - (noise * noisiness);
}
We apply this factor after the sun factor, and tuning the parameters a bit, we can now generate planets like this:
In-game shots
Here's a few shots of how the new planets look in-game:


Next time
We're almost at the end of the series. A couple of lose ends to tie up include getting the direction of the sun correct (it looks even worse now that we've got the atmosphere). I also want to see if it's possible to get images of stars generated. We might have to add a new kind of texture rendering for that, though. We'll see.
Series Index
Here are some quick links to the rest of this series: