Last time, we left off having generated a Voronoi diagram from a set of random points. This time, we're going to actually turn that into a texture.
Remember there's a few different kinds of planets in War Worlds. Today we'll look at the "inferno" type. For the inferno type planet, we want it to look like a big fireball or lava ball. The first step is to take our Voronoi diagram and turn it into a texture.
There's a couple of different ways we can do that, but for now I'm going to start out by plotting each pixel such that the intensity of the pixel is proportional to the distance from the nearest point in the point cloud. That is, pixels right on the point should be black, and pixels right on the edge of the cells of the voronoi diagram should be white.
public Colour getColour(Vector3 uv) {
    Vector2 pt = findClosestPoint(mVoronoi.getPoints(), uv);

    // find the closest neighbour
    List<Vector2> neighbours = mVoronoi.getNeighbours(pt);
    Vector2 neighbour = findClosestPoint(neighbours, uv);

    double neighbourDistance = uv.distanceTo(neighbour);
    double distance = uv.distanceTo(pt);
    double totalDistance = distance + neighbourDistance;

    double normalizedDistance = distance / (totalDistance / 2.0);
    return Colour.fromIntensity(normalizedDistance);
}
First, it looks for the point in the point cloud that the current texel is closest to. Then it finds all that points neighbours and it works out which of the neighbours is the closest to our texel. With those two points in hand (the closest point and it's closest neighbour), we just calculate how from the midpoint the texel is.
This makes use of a new function I added to my Voronoi class from last time, getNeighbours. What this method does is, given a point, it looks at all the triangles that the point is a vertex of, and then returns all of the other vertices of those triangles. So if you look at the following picture:
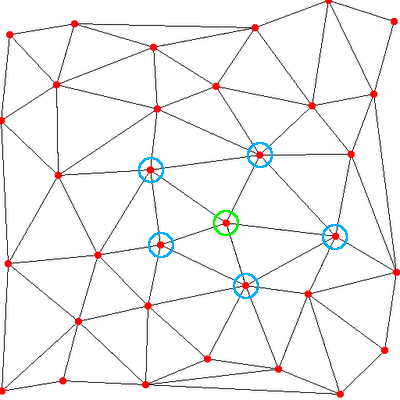
If the green vertex is the closest to the point we're currently texturing, then the blue vertices are it's neighbours. We can find them very easily using the mPointCloudToTriangles collection I described last time. Get the triangles and all the points that are not the current that make up the vertices of those triangles are the neighbours.
findClosestPoint is a simple O(n) function that just loops through all the points in the collection and returns the one closest to the given point:
private Vector2 findClosestPoint(List<Vector2> points, Vector2 pt) {
    Vector2 closest = null;
    double distance2 = 0.0;

    for (Vector2 v : points) {
        if (closest == null) {
            closest = n;
            distance2 = pt.distanceTo2(n);
        } else {
            double thisDistance2 = pt.distanceTo2(n);
            if (thisDistance2 < distance2) {
                closest = n;
                distance2 = thisDistance2;
            }
        }
    }

    return closest;
}
distanceTo2 returns the square of the distance to the other Vector2 (saves a sqrt() since we don't care).
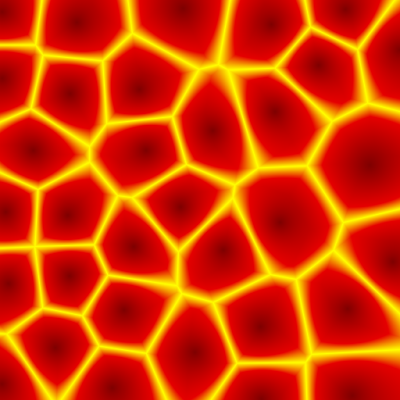
So plotting the getColour function, we turn up with something like this:

You can already see the lava shape is kind of there. We just need to give it some colour. I could just have it interpolate between red and yellow (say) but that's not very flexible. I'd rather use something like a colour gradient so that I can be a little bit more flexible with colouring.
Colour gradient
A colour gradient is very simple, it just maps a value between 0 and 1 to a colour, here's some code:
public class ColourGradient {
    private List<Node> mNodes;

    public ColourGradient() {
        mNodes = new ArrayList<Node>();
    }

    public void addNode(double n, Colour colour) {
        int index;
        for (index = 0; index < mNodes.size() - 1; index++) {
            if (mNodes.get(index).n > n) {
                break;
            }
        }

        if (mNodes.size() > 0)
            index++;
        mNodes.add(index, new Node(n, colour));
    }

    public Colour getColour(double n) {
        // if the value they gave us is less that our first
        // node, return it's colour.
        if (mNodes.get(0).n > n) {
            return mNodes.get(0).colour;
        }

        for (int i = 0; i < mNodes.size() - 1; i++) {
            Node lhs = mNodes.get(i);
            Node rhs = mNodes.get(i + 1);
            if (rhs.n > n) {
                double factor = (n - lhs.n) / (rhs.n - lhs.n);
                return Colour.interpolate(lhs.colour,
                                          rhs.colour,
                                          factor);
            }
        }

        // if we get here, it's because the n they gave us is bigger
        // than all nodes we've got
        return mNodes.get(mNodes.size() - 1).colour;
    }

    class Node {
        public double n;
        public Colour colour;

        public Node(double n, Colour colour) {
            this.n = n;
            this.colour = colour;
        }
    }
}
If we then set up our colour gradient like so:
ColourGradient cg = new ColourGradient();
cg.addNode(0.0, Colour.fromArgb(1.0, 0.5, 0.0, 0.0));
cg.addNode(0.8, Colour.fromArgb(1.0, 0.9, 0.0, 0.0));
cg.addNode(1.0, Colour.fromArgb(1.0, 1.0, 1.0, 0.0));
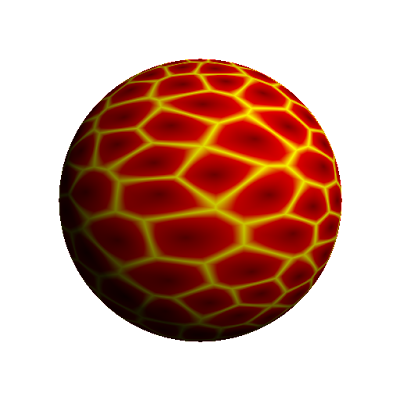
When we render our texture, we now see it comes out like so:
Not bad! Not great, but it's a start... the next step of course, is to get that texture mapped onto our sphere.
Texture Mapping
Now, I'll warn you in advance, I'm not too happy with the way the mapping is currently working, so this may change in the future. But mapping a point on the sphere to a pixel in the texture is actually not that difficult, and basically requires converting cartesian coordinates (that is, [x, y, z]) into polar coordinates (that is, angles [ϕ, Θ]). ϕ (phi) corresponds to "latitude" and Θ (theta) corresponds to "longitude".
Vector3 Vn = new Vector3(0.0, 1.0, 0.0);
Vector3 Ve = new Vector3(-1.0, 0.0, 0.0);
Vector3 Vp = intersection.normalized();

double phi = Math.acos(-1.0 * Vector3.dot(Vn, Vp));
double theta = (Math.acos(Vector3.dot(Vp, Ve) / Math.sin(phi)));
if (Vector3.dot(Vector3.cross(Vn,  Ve), Vp) <= 0) {
    theta = 1.0 - theta;
}

double v = phi / Math.PI;
double u = theta / (Math.PI * 2.0);

return mTexture.getTexel(u, v);
We start off with three unit-length vectors, Vn points to our north pole, Ve points to the equator (anywhere on the equator, it doesn't matter) and Vp points to the point on the sphere we're mapping (here, intersection is the point where the ray we're currently tracing intersects with the sphere).
The calculation of ϕ and Θ is pretty standard mapping of cartesian coordinates to polar coordinates. We then need to scale the values so they go from 0 to 1, and then we use them to query the colour of our texture. The result is something like this:
Here's a few more examples, with different parameters for generating the texture:
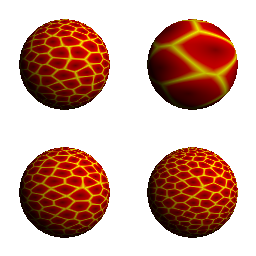
It's still not great, there's quite a bit of work to do, but I think we're making good progress! Keep in mind, these planets are going to be displayed at much smaller sizes in the actual game, so they don't need to be photo-realistic. In fact, we mostly prefer them to be a little cartoonish so that it's easy to differentiate between them (swamp vs. terran, inferno vs radiated, etc).
Next time
Next time, we'll tune the texture a little bit to make it look a bit more natural. And we'll also see what other kinds of planets we can make just by playing around with the colour gradients.
Series Index
Here are some quick links to the rest of this series: