It's always fun working on graphics. You get such instant gratification that you can see the fruit of your labour right there on the screen. The simulation algorithm is complicated and subtle, but it's not much fun trying to read the output of pages and pages of logs to see the fruits of your labour.
One of the things I wanted for War Worlds is a unique and varied world. Having an infinite universe to explore is not much good if everything looks the same anyway, so one of the things I wanted to do is to have dynamically-generated planet and star graphics. For now, I've just been using place-holders that I created using The GIMP, but this weekend I started on the code that will actually generate the images dynamically.
At it's heart, the code is a very simple ray-tracer. It's simple because we can assume the "scene" is made up of a single object -- the spherical planet, and one light source -- the star it's orbiting. Ray tracing is actually not that hard, it's just a matter of applying a bit of first-year linear algebra. Of course, it's not that easy if you've forgotten all of your first-year linear algebra, but luckily we have the internet to give us a kick-start.
This is going to be posted in multiple parts, due to the size (and the fact that I might get bored and do other stuff before the rendering is complete...)
Diffuse Lighting
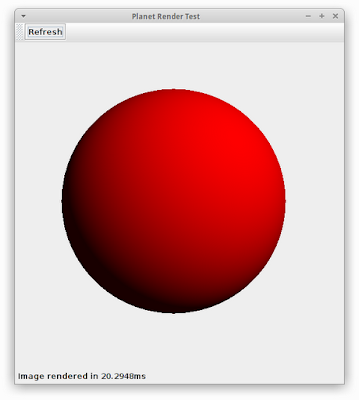
Above you can see the very first of my rendering code. It's just a red sphere with a bit of diffuse lighting applied. Here's an overview of the code I use to render this:
public void render(Image img) {
    for (int y = 0; y < img.getHeight(); y++) {
        for (int x = 0; x < img.getWidth(); x++) {
            double nx = ((double) x / (double) img.getWidth()) - 0.5;
            double ny = ((double) y / (double) img.getHeight()) - 0.5;
            Colour c = getPixelColour(nx, ny);
            img.setPixelColour(x, y, c);
        }
    }
}
So there's a couple of helper classes that I've written, Image, Colour and Vector3 which wrap up a representation of an image, an ARGB colour and a 3D vector respectively. The operations on those classes are pretty standard and not really worth discussing.
You can see this code just loops through each pixel in the image and calls getPixelColour, passing in the (normalized) x,y coordinates of the pixels. Here's getPixelColour as it's used to render the image above:
private Colour getPixelColour(double x, double y) {
    Colour c = new Colour();

    Vector3 ray = new Vector3(x, -y, 1.0).normalized();
    Vector3 intersection = raytrace(ray);

    if (intersection != null) {
        // we intersected with the planet. Now we need to work out the
        // colour at this point on the planet.
        double intensity = lightSphere(intersection);
        c.setAlpha(1.0);
        c.setRed(intensity);
    }
    return c;
}
The "heart" of this function is the "raytrace" method. We take a ray that goes from the "eye" (0,0,0), through the given pixel location and raytrace returns a point on the sphere where that ray intersects (or null if there's no intersection).
If there's an intersection, the lightSphere method is called to work out the light intensity at that point (as I said, currently it just uses diffuse lighting), and then we calculate the pixel colour based on that light intensity.
private Vector3 raytrace(Vector3 direction) {
    // intsection of a sphere and a line
    final double a = Vector3.dot(direction, direction);
    final double b = -2.0 * Vector3.dot(mPlanetOrigin, direction);
    final double c = Vector3.dot(mPlanetOrigin, mPlanetOrigin) -
                     (mPlanetRadius * mPlanetRadius);
    final double d = (b * b) - (4.0 * a * c);

    if (d > 0.0) {
        double sign = (c < -0.00001) ? 1.0 : -1.0;
        double distance = (-b + (sign * Math.sqrt(d))) / (2.0 * a);
        return direction.scaled(distance);
    } else {
        return null;
    }
}
The raytrace, as you can see, is just using the sphere-line-intersection algorithm that we all learnt (and promptly forgot, I'm sure) in first-year mathematics.
private double diffuse(Vector3 normal, Vector3 point) {
    Vector3 directionToLight = Vector3.subtract(mSunOrigin, point);
    directionToLight.normalize();

    return Vector3.dot(normal, directionToLight);
}

private double lightSphere(Vector3 intersection) {
    Vector3 surfaceNormal = Vector3.subtract(intersection, mPlanetOrigin);
    surfaceNormal.normalize();

    double intensity = diffuse(surfaceNormal, intersection);
    return Math.max(mAmbient, Math.min(1.0, intensity));
}
And here's our very simple lighting algorithm. We have an ambient level (set to 0.1 in the example image above), the origin of the "sun" which we assume (quite inaccurately!) to be a point light. In my test image, I put it far enough away that the point nature of the light isn't too big of a deal.
Timing
A quick diversion on timing. In the screenshot above, you can see it took about 20ms to render that sphere. This image is 512x512 pixels, which is much bigger than I expect to ever need on the phone (I'm thinking 256x256 or even 128x128 is the maximum I'll need) but also the phone's CPU is generally going to be much slower than the one on my desktop.
So my plan is that I want to be able to generate a 512x512 pixel planet in under 1 second on my desktop, in order for the performance to be acceptable on a phone. The idea is that rendering of planets will be done on background threads and cached anyway (since the same planet will always have the same image), so I could probably go even more complex if I really want to, but I'm just going to use the above as the initial benchmark to aim for.
Obviously I still have quite a bit of room to move, and the code is not optimized at all, but there's still a lot of features to add!
Series Index
Here are some quick links to the rest of this series:

